Best Kitchen Island Light Fixtures 2026
Your kitchen is the heart of your home, and the right lighting can transform it from a functional workspace into a stunning focal point that reflects your personal style. Whether you’re renovating your entire kitchen or simply looking to upgrade one key element, choosing the Best Kitchen Island Light Fixtures can dramatically enhance both the ambiance and functionality of your space. Within the first moments of entering a well-lit kitchen, guests notice the carefully selected kitchen island pendant lights that draw the eye and create visual interest. This comprehensive guide will walk you through everything you need to know about selecting, installing, and styling the perfect lighting for your kitchen island, ensuring your investment delivers both beauty and practicality for years to come.
Table of Contents
The importance of proper kitchen island lighting cannot be overstated. Beyond mere illumination, these fixtures serve as jewelry for your kitchen, adding character, defining spaces, and setting the mood for everything from quick weekday breakfasts to elaborate dinner parties. With countless styles, sizes, and configurations available, finding the perfect match for your kitchen’s unique personality has never been more exciting—or more achievable.
Materials & Decor Elements
Before embarking on your kitchen island lighting transformation, gather these essential materials and consider these decor elements:
Lighting Fixtures:
– Pendant light fixtures (quantity depends on island length—typically 2-3 for standard islands)
– Appropriate bulbs (LED recommended for energy efficiency)
– Dimmer switch for adjustable ambiance
– Ceiling canopy or mounting hardware (usually included)
Installation Tools:
– Voltage tester for safety
– Wire strippers and electrical tape
– Screwdriver set (flathead and Phillips)
– Drill with appropriate bits
– Measuring tape and pencil
– Ladder or step stool
– Wire nuts and junction box (if needed)
Supporting Decor Elements:
– Coordinating kitchen hardware (cabinet pulls, faucet finishes)
– Complementary bar stools or counter seating
– Decorative items for island styling (fruit bowls, cookbooks, plants)
– Area rug or runner to ground the space
– Window treatments that coordinate with fixture finish
Planning Materials:
– Graph paper or digital room planning tool
– Photos of your current kitchen
– Paint swatches or material samples
– Budget worksheet
Timing / Project Planning
Proper planning ensures your lighting project proceeds smoothly without unnecessary stress or delays.
Preparation Phase (1-2 weeks):
– Research styles and measure your island (2-3 days)
– Shop for fixtures and compare options (3-4 days)
– Order fixtures and await delivery (5-10 days)
– Schedule electrician if needed (varies by availability)
– Gather tools and materials (1 day)
Installation Day Timeline (2-4 hours):
– Turn off power and test electrical box (15 minutes)
– Remove existing fixture if applicable (15-30 minutes)
– Install mounting hardware (20-30 minutes)
– Wire new fixtures following manufacturer instructions (30-45 minutes per fixture)
– Secure fixtures and install bulbs (15-20 minutes per fixture)
– Test functionality and adjust height (20-30 minutes)
– Clean up and dispose of packaging (15 minutes)
Post-Installation Styling (1-2 hours):
– Adjust dimmer settings and experiment with lighting levels
– Arrange complementary decor around the island
– Photograph your finished space
– Make minor adjustments as needed
Best Times to Tackle This Project:
Consider scheduling your installation during weekday mornings when natural light helps with visibility, or plan for a weekend when you have flexibility for unexpected challenges. Avoid major holidays when hardware stores may have limited hours and electricians are less available.
Step-by-Step Instructions
Follow these detailed steps to successfully install yourBest way to grow 7 kitchen island lighting fixtures for your home and achieve professional-looking results.
Step 1: Measure and Plan Your Layout
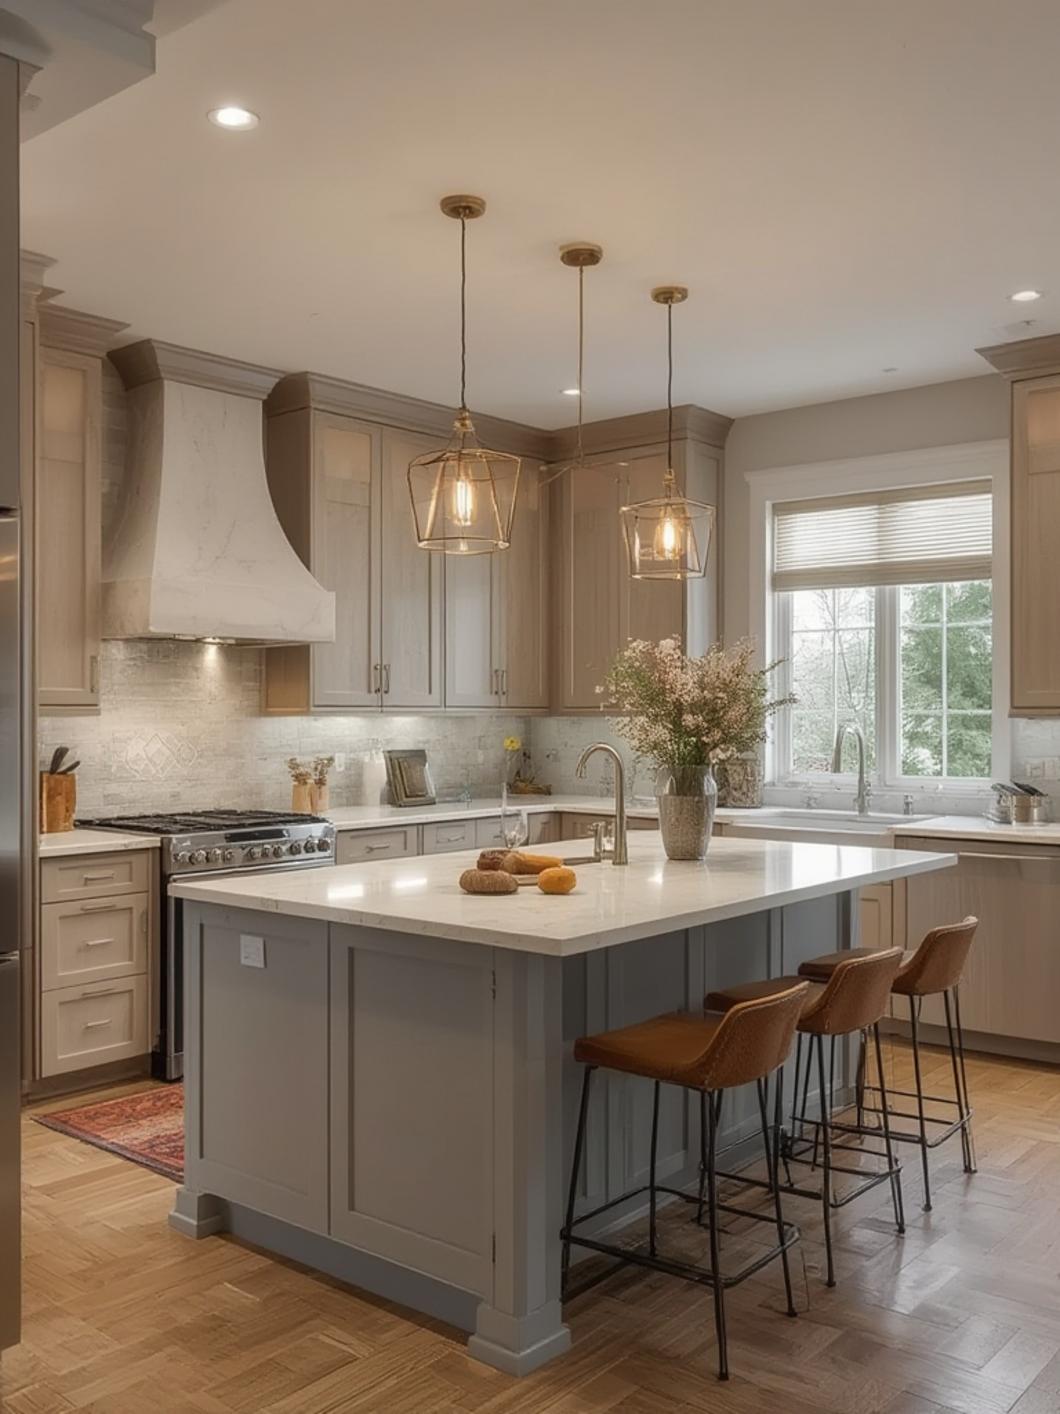
Measure your kitchen island’s length and width precisely. For optimal kitchen island pendant lights placement, fixtures should hang 30-36 inches above the countertop. Space multiple pendants evenly, leaving approximately 24-30 inches between each fixture’s center point. Mark your ceiling with light pencil marks where each fixture will hang.
Step 2: Select Your Fixture Style
Choose fixtures that complement your kitchen’s existing design elements. Consider the scale—larger islands accommodate bigger or multiple fixtures, while compact islands look best with streamlined designs. Match metal finishes to your cabinet hardware and faucet for a cohesive appearance.
Step 3: Ensure Electrical Safety
Before touching any wiring, locate your electrical panel and switch off power to the kitchen lighting circuit. Use a voltage tester to confirm power is completely off at the junction box. This critical safety step prevents electrical shock and potential injury.
Step 4: Install the Mounting Bracket
Most pendant fixtures include a mounting bracket that attaches to the existing junction box. Secure this bracket using the provided screws, ensuring it sits flush against the ceiling. The bracket should feel stable and support the fixture’s weight without wobbling.
Step 5: Make Electrical Connections
Follow the manufacturer’s wiring diagram carefully. Typically, you’ll connect black (hot) to black, white (neutral) to white, and green or bare copper (ground) to the ground wire. Twist wires together clockwise, secure with wire nuts, and wrap with electrical tape for added security. Gently tuck wired connections into the junction box.
Step 6: Attach the Fixture Canopy
Thread the fixture’s hanging rod or cord through the canopy, then secure the canopy to the mounting bracket. Hand-tighten any decorative screws or locking mechanisms. The canopy should sit flat against the ceiling, concealing all wiring and hardware.
Step 7: Adjust the Height
Most pendants feature adjustable cords or rods. Set the appropriate height based on your ceiling height and island usage. Standard recommendations suggest 30-32 inches above countertops for task lighting, or slightly higher (34-36 inches) if you have particularly tall family members or bar-height seating.
Step 8: Install Bulbs and Shades
Carefully install the recommended bulb type and wattage specified by the manufacturer. If your fixtures include glass shades, globes, or diffusers, attach them securely following the provided instructions. Ensure all components are properly seated to prevent rattling or loosening over time.
Step 9: Restore Power and Test
Return to your electrical panel and switch the circuit breaker back on. Test your new fixtures, checking that all bulbs illuminate properly. If you’ve installed a dimmer switch, test its full range of functionality from brightest to dimmest settings.
Step 10: Final Adjustments and Styling
Stand back and evaluate the overall appearance from multiple angles in your kitchen. Make any necessary height adjustments for visual balance. Clean fingerprints or smudges from fixtures, and begin styling your island with complementary decor elements that enhance rather than compete with your new lighting.
Benefits / Advantages
Installing the right kitchen island lighting delivers numerous advantages that extend beyond simple illumination:
Enhanced Task Lighting:
Properly positioned fixtures eliminate shadows on your work surface, making food preparation, cooking, and cleanup safer and more efficient. You’ll notice reduced eye strain during detailed tasks like chopping vegetables or reading recipes.
Improved Aesthetic Appeal:
Statement lighting fixtures serve as functional art pieces that elevate your kitchen’s entire design scheme. They create a finished, intentional look that increases your home’s perceived value and makes the space more photographable for potential resale.
Defined Spatial Zones:
In open-concept homes, island lighting helps delineate the kitchen area from adjacent living or dining spaces without requiring physical barriers. This creates visual organization while maintaining the flowing, connected feel modern homeowners desire.
Flexible Ambiance Control:
With dimmable fixtures, you can adjust lighting intensity to match different activities and times of day—bright for morning meal prep, softer for evening entertaining, or romantic for intimate dinner settings.
Energy Efficiency:
Modern LED fixtures consume significantly less electricity than traditional incandescent bulbs while producing superior light quality. This translates to lower utility bills and reduced environmental impact over the fixture’s lifespan.
Increased Home Value:
Updated lighting fixtures rank among the most cost-effective upgrades for improving a home’s market appeal. Real estate professionals consistently note that well-chosen kitchen lighting influences buyer perceptions positively during showings.
Personalized Style Expression:
From industrial farmhouse to contemporary minimalist, lighting fixtures allow you to inject personality into your kitchen. They’re one of the easiest elements to customize, making your space truly reflect your unique aesthetic preferences.
Tips, Alternatives, Styling Advice
Maximize your lighting project’s success with these professional tips and creative alternatives:
Budget-Friendly Options:
– Shop end-of-season sales at major home improvement retailers
– Consider rewiring and updating vintage fixtures from thrift stores or estate sales
– Mix one statement piece with simpler, less expensive companion fixtures
– DIY fixture makeovers using spray paint to update finishes on existing pieces
– Choose simple glass globe pendants that offer timeless style without premium pricing
Small Space Solutions:
– Single larger fixtures work better than multiple small ones in compact kitchens
– Mini pendants (under 8 inches in diameter) provide adequate light without overwhelming tight spaces
– Linear suspension fixtures illuminate longer, narrower islands efficiently
– Flush-mount or semi-flush fixtures work for kitchens with low ceilings (under 8 feet)
– Transparent or glass fixtures maintain visual openness in cramped areas
Style-Specific Recommendations:
– Modern Minimalist: Geometric shapes, matte black or brushed nickel finishes, clean lines
– Farmhouse/Rustic: Wire cages, seeded glass, distressed metals, Edison bulbs
– Traditional/Classic: Polished brass or bronze, fabric shades, ornate details
– Industrial: Exposed hardware, metal shades, factory-inspired designs
– Coastal/Cottage: Woven materials, rope details, soft colors, beach-inspired elements
Mixing Metals Successfully:
Don’t feel constrained to match every metal finish exactly. A curated mix of warm and cool tones adds depth and interest. Follow the 80/20 rule—choose one dominant metal for 80% of finishes, then introduce an accent metal for the remaining 20%.
Layered Lighting Strategy:
Kitchen island fixtures should work as part of a comprehensive lighting plan that includes ambient recessed lights, under-cabinet task lighting, and accent lighting for display areas. This layered approach provides flexibility for various activities and moods.
Smart Technology Integration:
Consider smart bulbs or compatible fixtures that integrate with home automation systems. Voice-controlled dimming, scheduling, and color temperature adjustment add convenience and modernize your space without visible technology cluttering your design.
Common Mistakes to Avoid
Steer clear of these frequent pitfalls that can compromise your lighting project’s success:
Mistake 1: Incorrect Sizing
Installing fixtures that are too small creates a disconnected, disproportionate appearance, while oversized fixtures overwhelm the space. Solution: Follow the general guideline that pendant diameter should be one-quarter to one-third of your island’s width for balanced proportions.
Mistake 2: Improper Height Adjustment
Hanging fixtures too low creates head-bumping hazards and obstructs sightlines, while hanging them too high diminishes their task lighting effectiveness. Solution: Maintain the 30-36 inch range from countertop to fixture bottom, adjusting based on ceiling height and personal preference.
Mistake 3: Mismatched Scale Between Multiple Fixtures
When installing multiple pendants, choosing fixtures that don’t relate proportionally to each other creates visual discord. Solution: Select identically sized fixtures for symmetry, or intentionally vary sizes in odd-number groupings (like one large centered fixture flanked by two smaller ones).
Mistake 4: Ignoring Light Bulb Selection
Assuming any bulb will work leads to poor color rendering, inadequate brightness, or excessive energy consumption. Solution: Research the recommended bulb type, color temperature (2700-3000K for warm white kitchen ambiance), and lumens output for your specific fixtures and needs.
Mistake 5: Failing to Install a Dimmer
Single-intensity lighting limits functionality and ambiance control in this multipurpose space. Solution: Invest in a quality dimmer switch compatible with your bulb type (LED-compatible dimmers for LED bulbs) during the initial installation.
Mistake 6: Neglecting the Complete Electrical Inspection
Proceeding with installation without verifying electrical box capacity, wiring condition, and proper grounding risks safety hazards. Solution: If you’re uncertain about your electrical system’s condition, consult a licensed electrician before purchasing fixtures.
Mistake 7: Style Inconsistency
Choosing trendy fixtures that clash with your kitchen’s established design creates a disjointed appearance that dates quickly. Solution: Select fixtures that complement your existing cabinetry, countertops, and hardware while allowing for personal expression within that framework.
Mistake 8: Inadequate Planning for Wiring Locations
Installing fixtures without accounting for existing junction box locations may require expensive electrical work to relocate boxes. Solution: Plan fixture placement around existing wiring infrastructure, or budget for professional electrical modifications before purchasing fixtures.
Maintenance / Upkeep Tips
Preserve your investment and keep your fixtures looking spectacular with these maintenance practices:
Regular Cleaning Schedule:
Dust pendant fixtures weekly using a microfiber cloth or feather duster to prevent buildup. Monthly, perform deeper cleaning with appropriate methods for your fixture’s material—glass cleaner for transparent shades, mild soap solution for metal finishes, and specialized cleaners for specialty materials like fabric or wood.
Bulb Replacement Protocol:
Always turn off power at the switch before replacing bulbs. Keep spare bulbs on hand matching the correct type, wattage, and color temperature. When one bulb in a multi-fixture setup burns out, consider replacing all bulbs simultaneously to maintain consistent light output and color.
Annual Inspection:
Once yearly, examine mounting hardware for any loosening from vibration or settling. Tighten screws, check wire connections if accessible, and verify that decorative elements remain secure. This prevents potential safety issues and extends fixture lifespan.
Finish Protection:
Different metal finishes require specific care. Lacquered or powder-coated metals resist fingerprints and corrosion but shouldn’t be cleaned with abrasive materials. Living finishes like brass or copper develop natural patina—decide whether you’ll embrace this change or maintain the original appearance with specialized polish.
Addressing Common Issues:
– Flickering lights: Check bulb seating, replace old bulbs, or investigate dimmer compatibility
– Buzzing sounds: Often indicates dimmer-bulb incompatibility; upgrade to quality LED-compatible dimmer
– Discoloration: Usually caused by excessive heat; verify you’re using correct wattage bulbs
– Loose components: Periodically tighten set screws on shades, globes, and hanging rods
Seasonal Updates:
Consider changing bulb color temperature seasonally—slightly cooler tones (3500K) in summer create a fresher feel, while warmer tones (2700K) in winter enhance coziness. This subtle shift refreshes your space without physical changes.
Professional Servicing:
Every 3-5 years, consider having a licensed electrician inspect connections, especially if you notice any irregular behavior. This preventive maintenance catches potential problems before they become safety hazards or require expensive repairs.
Conclusion
Transforming your kitchen with the Best Kitchen Island Light Fixtures represents one of the most impactful updates you can make to enhance both functionality and style. Throughout this guide, we’ve explored every aspect of selecting, installing, and maintaining kitchen island pendant lights that perfectly suit your space, from initial measurements and style selection through ongoing care that preserves their beauty for years to come.
The journey to exceptional kitchen lighting begins with thoughtful planning and attention to detail, but the rewards—improved task lighting, enhanced ambiance, and elevated aesthetic appeal—make every effort worthwhile. Whether you’ve chosen sleek modern pendants, rustic farmhouse fixtures, or timeless traditional designs, your new lighting establishes a focal point that draws people together and makes your kitchen a more inviting, functional heart of your home.
Remember that lighting design isn’t static; as your needs and preferences evolve, the flexibility of dimmable fixtures and the option to update bulbs or shades allows your kitchen to grow with you. The investment you’ve made in quality fixtures and proper installation will continue delivering value through improved daily experiences and increased home value.
Ready to illuminate your kitchen’s full potential? Take the first step today by measuring your island, exploring fixture styles that speak to your aesthetic, and beginning your transformation journey. Share your completed project on social media using #KitchenLightingMakeover to inspire others, and don’t hesitate to consult with lighting professionals if you need additional guidance. Your dream kitchen awaits—let there be light!
FAQs
Q: How many pendant lights do I need for my kitchen island?
A: The number depends on your island’s length. For islands 4-5 feet long, two pendants work well. Islands 6-7 feet long accommodate three fixtures comfortably. Measure your island and space fixtures 24-30 inches apart for balanced illumination and visual appeal.
Q: Can I install kitchen island lighting myself, or do I need an electrician?
A: If you have basic electrical knowledge, existing junction boxes in the correct locations, and confidence working with wiring, DIY installation is possible. However, if you need to relocate electrical boxes, install new circuits, or feel uncertain about electrical safety, hiring a licensed electrician ensures code compliance and safety.
Q: What’s the ideal height to hang pendant lights over a kitchen island?
A: Standard recommendation is 30-36 inches from the countertop surface to the bottom of the fixture. Adjust based on ceiling height (higher ceilings allow fixtures to hang slightly lower) and your household’s height (taller family members may need fixtures positioned at the higher end of this range).
Q: How do I choose the right size pendant for my island?
A: Calculate fixture diameter using this formula: island width divided by 3 or 4 equals appropriate pendant diameter in inches. For example, a 36-inch-wide island works well with 9-12 inch diameter pendants. When using multiple fixtures, total fixture width should not exceed two-thirds of the island’s length.
Q: What color temperature bulbs work best for kitchen island lighting?
A: For kitchen spaces, 2700K-3000K (warm white) creates an inviting atmosphere while providing adequate task lighting for food preparation. This range complements skin tones during dining and doesn’t cast unflattering color casts on food. Avoid bulbs above 3500K in kitchens, as they create a harsh, institutional feel.