Linear vs Pendant Island Lighting: The Ultimate Guide to Choosing the Perfect Kitchen Fixture
Table of Contents
Transforming your kitchen into a functional and stylish space starts with selecting the right lighting. Whether you’re renovating or simply updating your home, understanding the differences between Linear vs Pendant Island Lighting can dramatically impact both the aesthetics and functionality of your cooking space. Kitchen islands serve as the heart of modern homes, and the lighting above them deserves careful consideration. In this comprehensive guide, we’ll explore how pendant island lighting fixtures compare to linear options, helping you make an informed decision that elevates your home’s interior design while meeting your practical lighting needs.
Choosing between linear and pendant fixtures isn’t just about style—it’s about creating the perfect balance between task lighting, ambient illumination, and visual interest. The right choice can make your kitchen island the stunning focal point it deserves to be, while the wrong selection might leave you with inadequate lighting or a design mismatch. Let’s dive into everything you need to know to make the best decision for your space.
Materials & Decor Elements
Before beginning your kitchen island lighting project, gather these essential materials and tools:
Lighting Fixtures:
– Linear island light fixture or multiple pendant lights (depending on your choice)
– Compatible LED bulbs (recommended: 2700K-3000K for warm ambiance)
– Dimmer switch for adjustable lighting levels
– Mounting hardware (usually included with fixtures)
Installation Tools:
– Voltage tester for safety
– Wire strippers and cutters
– Screwdrivers (flathead and Phillips)
– Drill with appropriate bits
– Wire nuts and electrical tape
– Ladder or step stool
– Measuring tape and pencil
Decor Considerations:
– Coordinating finishes (brushed nickel, matte black, brass, or bronze)
– Shade materials (glass, metal, fabric, or wood)
– Decorative canopy covers
– Chain or rod extensions for height adjustment
Safety Equipment:
– Circuit breaker labels
– Work gloves
– Safety glasses
Having all materials ready before starting ensures a smooth installation process and helps you visualize how your chosen fixtures will complement your existing kitchen decor, cabinetry, and color scheme.
Timing / Project Planning
Preparation Time: 2-3 hours
Before installation, dedicate time to:
– Researching fixture styles that complement your kitchen design (30-60 minutes)
– Measuring your island dimensions and ceiling height (15 minutes)
– Determining proper placement and spacing (30 minutes)
– Shopping for fixtures online or in-store (1-2 hours)
– Reviewing electrical codes and requirements (30 minutes)
Installation Time: 2-4 hours
The actual installation timeline varies based on:
– Your electrical experience level
– Whether you’re replacing existing fixtures or installing new ones
– The complexity of your chosen fixtures
– If electrical box modifications are needed
For beginners, plan for 4 hours to complete the installation safely. Experienced DIYers might finish in 2 hours. If your project requires new electrical wiring or you’re uncomfortable with electrical work, hiring a licensed electrician adds 1-2 hours but ensures safety and code compliance.
Best Timing:
Schedule your installation during daylight hours on a weekend when you can work without time pressure. Avoid peak cooking times, and plan to have your electrical circuit turned off for 2-4 hours.
Step-by-Step Instructions
Step 1: Measure and Plan Your Layout
Begin by measuring your kitchen island’s length, width, and the distance from the island to the ceiling. For Linear vs Pendant Island Lighting, these measurements determine your fixture selection:
– For linear fixtures: Choose a length that’s 1/2 to 2/3 the length of your island
– For pendant fixtures: Plan 2-3 pendants for islands 6 feet or longer, spacing them 24-30 inches apart
Mark your ceiling where fixtures will mount, ensuring they’re centered over the island and 30-36 inches above the countertop surface.
Step 2: Turn Off Power and Verify
Locate your kitchen’s circuit breaker and turn off power to the existing light fixture. Use a voltage tester to confirm the power is completely off before touching any wires. This critical safety step cannot be skipped.
Step 3: Remove Existing Fixtures (If Applicable)
Carefully remove your old light fixture by:
– Unscrewing the mounting plate
– Disconnecting wire connections (note which wires connect together)
– Removing the old electrical box if it won’t support your new fixture’s weight
Step 4: Install Mounting Hardware
For pendant island lighting fixtures, you’ll need individual mounting points for each pendant. For linear fixtures, install the provided mounting bar to the electrical box. Ensure all hardware is secured to ceiling joists or uses appropriate anchors for your ceiling type.
Step 5: Connect Electrical Wiring
Connect wires according to manufacturer instructions:
– Black (hot) to black
– White (neutral) to white
– Copper or green (ground) to ground wire or grounding screw
Secure connections with wire nuts and wrap with electrical tape. Carefully tuck wires into the electrical box.
Step 6: Attach Fixture Canopy and Adjust Height
Mount the canopy that covers the electrical box, ensuring a flush, secure fit. For pendants, adjust chain or rod length to achieve your desired height. For linear fixtures, attach the fixture body to the mounting hardware.
Step 7: Install Bulbs and Test
Install the appropriate bulbs, restore power at the circuit breaker, and test your new lighting. Install a dimmer switch if desired for maximum flexibility in creating ambiance.
Step 8: Final Adjustments and Styling
Make final height adjustments, ensuring consistent spacing for multiple pendants. Clean fingerprints from fixtures and adjust the direction of adjustable shades to optimize light distribution over your work surface.
Benefits / Advantages
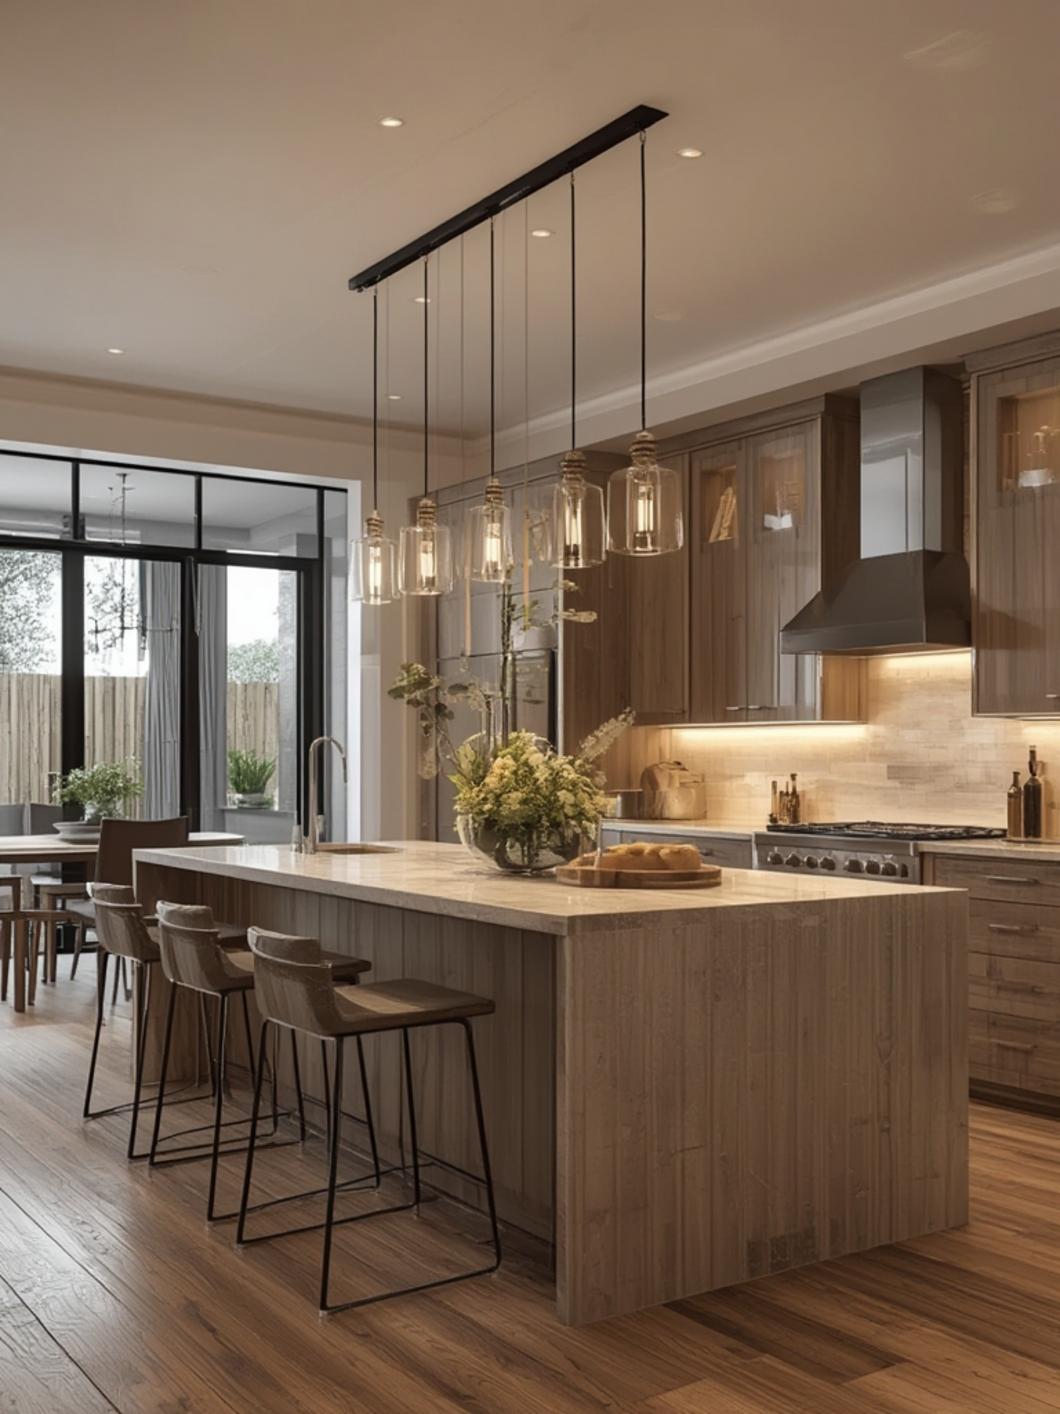
Linear Island Lighting Benefits:
1. Uniform Light Distribution: Linear fixtures provide consistent illumination across the entire island length, eliminating dark spots and creating excellent task lighting for food preparation.
2. Modern, Streamlined Aesthetic: These fixtures offer a contemporary, minimalist look that works beautifully in modern and transitional kitchens.
3. Single Installation Point: Simpler installation with just one electrical connection required, reducing installation time and complexity.
4. Space Efficiency: Linear designs work exceptionally well in kitchens with lower ceilings or smaller spaces where multiple pendants might feel crowded.
5. Integrated Design: Many linear fixtures incorporate multiple bulbs within one cohesive design, creating visual harmony.
Pendant Island Lighting Benefits:
1. Dramatic Visual Impact: Individual pendants create striking focal points and add vertical interest to your kitchen design.
2. Customizable Arrangements: Mix and match pendant styles, sizes, and heights for a personalized, designer look.
3. Targeted Task Lighting: Position pendants precisely where you need the most light for cooking, serving, or homework zones.
4. Style Versatility: Available in countless designs from industrial to farmhouse, traditional to contemporary, allowing perfect style matching.
5. Adjustable Ambiance: Individual pendants can be positioned at varying heights to create dynamic, layered lighting effects.
Shared Benefits:
Both lighting types enhance property value, reduce eye strain during kitchen tasks, and serve as decorative elements that complete your kitchen’s design story. They provide essential task lighting while contributing to the overall ambiance of your home’s most-used space.
Tips, Alternatives, Styling Advice
Budget-Friendly Alternatives:
– Mix high-end statement pieces with affordable options (one expensive central pendant with two budget-friendly side pendants)
– Choose fixtures with standard socket sizes to use budget LED bulbs
– DIY pendant shades using baskets, wire frames, or repurposed materials
– Select simple linear tracks that allow bulb exposure for industrial charm without high fixture costs
Small Space Solutions:
– For islands under 4 feet, use a single centered pendant or mini linear fixture
– Choose fixtures with clear or light-colored shades to avoid visual heaviness
– Consider adjustable pendant heights to raise fixtures when not in use
– Opt for slim-profile linear designs that don’t overwhelm compact kitchens
Style-Specific Recommendations:
Modern/Contemporary Kitchens:
– Geometric pendant shapes in matte black or brushed nickel
– LED linear fixtures with clean lines and integrated technology
– Glass globe pendants with visible Edison bulbs
Farmhouse/Rustic Kitchens:
– Mason jar pendants or lantern-style fixtures
– Wood-beaded chandeliers with linear configurations
– Metal pendants with distressed or oil-rubbed bronze finishes
Traditional Kitchens:
– Bell-shaped or dome pendants in polished nickel or brass
– Linear fixtures with decorative scrollwork or crystal accents
– Schoolhouse-style glass pendants
Pro Styling Tips:
1. Layer Your Lighting: Combine island lighting with under-cabinet lights, recessed ceiling lights, and decorative accent lighting for depth
2. Match Metal Finishes: Coordinate fixture finishes with cabinet hardware, faucets, and appliances for cohesive design
3. Consider Scale: Larger islands demand more substantial fixtures—don’t choose lights that appear too small or insignificant
4. Create Contrast: Use lighting to introduce contrasting colors or textures against cabinetry
5. Mind the Sight Lines: Ensure pendants don’t obstruct conversation views across the island or into adjacent spaces
Alternative Lighting Combinations:
– Install track lighting with adjustable heads for maximum flexibility
– Use mini pendants clustered at different heights for artistic appeal
– Combine a linear fixture with accent pendants on either end for a layered look
– Consider linear fixtures with adjustable light heads for customizable direction
Common Mistakes to Avoid
1. Incorrect Height Placement
Mistake: Hanging fixtures too high or too low creates poor lighting and visual imbalance.
Solution: Maintain 30-36 inches between the bottom of your fixture and the island countertop. Adjust slightly higher (38-40 inches) if household members are particularly tall, or if you want an airier feel in the space.
2. Wrong Size Selection
Mistake: Choosing fixtures that are disproportionate to your island size makes the space feel unbalanced.
Solution: For linear fixtures, select lengths that are 1/2 to 2/3 your island’s length. For pendants, space them 24-30 inches apart and maintain at least 6 inches from the island’s edge.
3. Inadequate Light Output
Mistake: Prioritizing style over functionality leaves your workspace too dim for food preparation.
Solution: Calculate lumens needed (aim for 35-50 lumens per square foot of island surface) and choose fixtures that accommodate sufficient bulb wattage. Add dimmer switches to adjust brightness levels.
4. Ignoring Ceiling Height
Mistake: Not adjusting pendant length or choosing fixtures inappropriate for ceiling height creates awkward proportions.
Solution: For 8-foot ceilings, use shorter pendants or mini fixtures. For 9-10 foot ceilings, standard pendants work well. For vaulted or higher ceilings, use extended chains or rods to bring lights to the proper height above the island.
5. Mismatched Style
Mistake: Selecting fixtures that clash with your kitchen’s design aesthetic disrupts visual harmony.
Solution: Consider your cabinet style, hardware finishes, and overall design theme before purchasing. Bring photos of your kitchen when shopping, or use visualization apps to preview fixtures in your space.
6. Poor Quality Fixtures
Mistake: Buying cheap fixtures that tarnish, malfunction, or look dated quickly.
Solution: Invest in quality fixtures with good warranties. Read reviews, check construction materials, and choose reputable manufacturers. Remember that lighting is a long-term investment in your home.
7. DIY Electrical Work Beyond Your Skill Level
Mistake: Attempting complex electrical installation without proper knowledge creates safety hazards.
Solution: Know your limits. Simple fixture replacement is DIY-friendly for most homeowners, but new wiring, circuit additions, or complex installations warrant professional help. Electrical work must meet local codes for safety and insurance purposes.
8. Forgetting Dimmer Compatibility
Mistake: Installing dimmers without verifying LED compatibility causes flickering or buzzing.
Solution: Purchase dimmers specifically rated for LED bulbs if using LED lighting. Check manufacturer specifications to ensure all components work together seamlessly.
Maintenance / Upkeep Tips
Regular Cleaning (Weekly to Monthly):
1. Dust Prevention: Use a microfiber cloth or duster to remove dust from fixture surfaces weekly, preventing buildup that dims light output.
2. Glass and Metal Cleaning: Mix mild dish soap with warm water for glass shades. For metal finishes, use appropriate cleaners (avoid abrasives on brushed finishes; use brass cleaner on brass fixtures).
3. Bulb Maintenance: Wipe bulbs gently when cool to remove grease and dust that accumulate in kitchen environments, improving light quality and bulb longevity.
Deep Cleaning (Quarterly):
1. Turn off power at the circuit breaker
2. Remove pendants or detachable parts from linear fixtures
3. Wash removable shades in sink with warm, soapy water
4. Dry completely before reinstalling
5. Clean unreachable components with an extension duster or slightly damp cloth
Bulb Replacement:
Replace bulbs promptly when they burn out to maintain consistent lighting levels. LED bulbs typically last 15,000-50,000 hours but may fail prematurely in high-heat environments. Keep spare bulbs on hand that match your fixture’s specifications.
Annual Maintenance:
– Check all mounting hardware for tightness
– Inspect electrical connections (with power off) for any signs of wear or corrosion
– Test dimmer switches for proper function
– Verify pendants hang evenly and adjust if needed
– Update outdated bulbs to newer, more efficient LED technology
Longevity Tips:
– Install dimmers to reduce bulb stress and extend lifespan
– Keep kitchen well-ventilated to prevent heat damage to fixtures
– Address any flickering or electrical issues immediately
– Consider protective coatings for fixtures in high-grease cooking areas
– Upgrade to smart bulbs for convenience and energy monitoring
Seasonal Updates:
Refresh your lighting seasonally by:
– Swapping bulb color temperature (warmer in winter, cooler in summer)
– Adding decorative elements like greenery or seasonal accents to pendants
– Cleaning fixtures thoroughly as part of spring and fall deep cleaning routines
Conclusion
Deciding between Linear vs Pendant Island Lighting ultimately depends on your kitchen’s size, style, and functional requirements. Linear fixtures offer streamlined elegance and uniform illumination, perfect for modern spaces and those seeking cohesive, minimalist design. Meanwhile, pendant island lighting fixtures provide customizable style, dramatic visual impact, and targeted task lighting that can be precisely positioned for your specific needs. Both options transform your kitchen island into a well-lit, beautiful focal point that enhances your home’s value and your daily cooking experience.
The key to making the right choice lies in carefully measuring your space, considering your kitchen’s overall design aesthetic, and honestly assessing your lighting needs. Whether you choose the clean lines of linear fixtures or the personalized charm of pendant lights, proper installation and maintenance will ensure your investment illuminates your home beautifully for years to come.
Ready to transform your kitchen island? Start by measuring your space today, exploring fixture options that speak to your style, and taking the first step toward creating the kitchen of your dreams. Remember, great lighting isn’t just about seeing better—it’s about living better in the heart of your home. If you found this guide helpful, share it with friends planning their own kitchen updates, and check out our other home improvement articles for more design inspiration!
FAQs
Q1: How many pendant lights do I need for my kitchen island?
For islands 4-5 feet long, use 2 pendant lights. For islands 6-7 feet long, use 3 pendants. For islands 8+ feet long, consider 4 pendants or a linear fixture. Space pendants 24-30 inches apart, starting 6-12 inches from each island end. The goal is balanced illumination without overcrowding.
Q2: Can I mix linear and pendant lighting over my kitchen island?
While possible, mixing fixture types over a single island typically creates visual confusion. Instead, use linear or pendants over the island, and complement with different lighting types elsewhere in the kitchen (recessed ceiling lights, under-cabinet lighting, or decorative fixtures in dining areas) for a cohesive, layered lighting plan.
Q3: What’s the best color temperature for kitchen island lighting?
Choose 2700K-3000K (warm white) for residential kitchens to create inviting ambiance while providing adequate task lighting. This range complements skin tones, makes food look appealing, and feels comfortable for extended periods. Avoid cool white (4000K+) in kitchens unless you’re creating a commercial or ultra-modern aesthetic.
Q4: Do linear fixtures cost more than pendant lights?
Pricing varies widely based on quality, brand, and design complexity. Simple linear fixtures may cost $100-$300, while designer options reach $1,000+. Individual quality pendants range from $50-$400 each, so three pendants might total $150-$1,200. Generally, budget-friendly options exist in both categories, and total cost depends more on style preferences than fixture type.
Q5: How do I know if my ceiling electrical box can support my chosen fixture?
Check your fixture’s weight specifications and compare to your electrical box rating (stamped on the box itself). Standard ceiling boxes support fixtures up to 50 pounds. Heavier linear fixtures or large glass pendants may require ceiling fan-rated boxes (supporting 75+ pounds) or brace systems installed between ceiling joists. When in doubt, consult an electrician to ensure safe installation.